XML Photo Album v1.7.0
Release Date: April 20, 2010Overview
XML Photo Album is a free, open-source two-component system for creating and displaying albums of digital photos. The first component is the Album Generator application which runs under the Microsoft .NET Framework 2.0 on Windows 98 and later, and may run under Mono in Linux. The Album Generator creates an XML database of all the album data. Albums are viewed in a web browser using the second component of the software, a set of files which automatically format the album display.
For distribution and archiving, the album's directory can be made public on a web page, or burned to a CD or DVD. No special software besides a web browser is necessary to view the albums created with this system.
This display system has been tested on Internet Explorer 6+, Mozilla Firefox 2+, Opera 9+, and Google Chrome 1+ for Windows. It will most likely also work properly on these same browsers in Linux and Mac OS. (For Internet Explorer, ActiveX must be enabled). Some browsers (and older versions of the browsers mentioned above) may not support the required Javascript, and some do not support XSLT. The index page does not use Javascript, so if that doesn't display, your browser probably doesn't support XSLT.
For further information, and to check for updates, see http://xmlalbum.sourceforge.net.
The browser display portion of this system was created by Belle Philibosian. The Album Generator was created by Adam Azarchs. All components are copyright 2005-2010 Belle Philibosian and Adam Azarchs. Some rights reserved under the MIT license, see the 'license.txt' file distributed with the Album Generator application.
Creating a New Album
Click New Album to create a new album. A window will open to let you choose a folder in which to generate the album. This folder cannot contain another 'album.xml' file. The application will generate the proper subfolders and add the auxiliary files to the proper locations, but if there is a set of display files already in the folder, they will not be overwritten. On versions of Windows before XP, or in Mono, the Create new folder button may not exist, or may not work. The new album will load into the generator with the album title set as the folder name by default, but this title can be changed at any time. Note: changing the album title does NOT change the name of the folder in which the album is stored. The album folder name can only be changed manually (e.g. in Windows Explorer), and should not be changed while the album is loaded in the generator.
Loading an Existing Album
Click Load Album to load an existing album. A box will pop up giving you the option to open the most recently loaded album. If this is not the one you want, click No and a window will open to let you browse to a folder containing an album. This folder must contain an 'album.xml' file. The application will generate the proper subfolders and add the auxiliary files to the proper locations if they do not already exist. It will then load the information from the 'album.xml' file. It will create the file 'album.xml.old' (overwriting the previous one, if it exists) with the contents of the current 'album.xml'. If at any time you want to cancel all of the changes made to an album since loading it into the generator, close the generator, delete 'album.xml', and rename 'album.xml.old' to 'album.xml'.
You may also open an album by right-clicking the 'album.xml' file in Windows Explorer and choosing Open With (this option may not be present in versions prior to XP). If XML Album Generator is not one of the offered options, click Choose Program. If the XML Album Generator does not appear in the list in the Choose Program dialog, Browse to the location of the application (usually C:\Program Files\XML Album Generator\AlbumGenerator.exe) and select it. After this has been done once, the album generator should be one of the Open With choices for all XML files.
Additionally, you can open an album from the command prompt in either Windows or Linux by running the following command:
[path to application]\AlbumGenerator.exe [path to album directory]\album.xml
If you are editing an album created with an earlier version of the Album Generator, you may want to refresh the display theme files in the album directory to the newest version. If the Album Generator detects obsolete display files when loading an older album, a dialog box will appear asking if you want to update them. Note that display files for the default theme v.1.5.1 or earlier will not display properly with album.xml files created by v.1.6 or later versions of the generator. Therefore, they MUST be updated in order to properly display any album which has been loaded into the v.1.6 or later generator. Updating is generally recommended for any version. The update can be done manually in the Advanced Options dialog box.
Adding and Removing Images
Add Image opens a dialog box that allows you to browse for images to be added to the album. In addition to JPEG format, Graphics Interchange Format (GIF), Portable Network Graphic (PNG) and bitmap (BMP) images may be included. Most browsers will not display TIFF images without a plugin; if you attempt to add a TIFF image the generator will give you a warning to this effect. The generator may allow you to add other image formats, but most others will not be displayed by most browsers.
Select one or more images and click Open to copy them to the album's images folder, and entries in 'album.xml' will be created for them. Images are added to the list below the image that was selected when the Add Image button was pressed; if no image was selected they will be added at the bottom of the list. The image files will not be deleted from their original location, so if you want to have only one copy of your image files, you should move them to the images folder before adding them to the album. If you attempt to add a file with the same name as a file already in the images folder, the generator will give the option of renaming the file which is being added, overwriting the existing file, or cancelling the addition. If you are adding image files from the images folder, a second copy will not be created. By default, the Title is set to the file name without the file extension, and the Location and Photographer are set to whatever was used last in those fields. For the Date, the application attempts to read from the image's EXIF tag, which is created by most digital cameras. If that fails, the file creation date or the file modification date is used, whichever is earlier.
Remove Image removes an image from the album, but does not delete the image file from the images folder or the image thumbnail from the 'thumbs' folder, if thumbnails are being used.
Selecting and Ordering Images
When an image is added to the album, it should appear in the list on the right side of the window, with its thumbnail, below the currently selected image. If there is no current selection, the new photo is added to the bottom of the list. When a photo is selected, its data are displayed, as well as a larger version of the image in the preview pane. To select an image, either click it, or use the Page Up/Page Down or up/down arrow keys. (Note: if the image list panel has focus, Page Up/Page Down will cycle through pages of the list rather than individual images. If one of the data entry fields has focus, Page Up/Page Down will cycle through individual images and the cursor will remain in that data field.)
Sort by Date sorts the images in ascending date order. Images can also be reordered manually with the Move Up and Move Down buttons. To move more than one image at a time, see Multiple Image Selection.
Rotating Images
Located above the preview image are buttons to rotate the image by 90 degrees in either direction, as well as a display of the pixel dimensions of the image. The image thumbnail will also be rotated accordingly so it will display in the right orientation on the album index page.
Entering Data
The following is a summary of the text entry fields in the Album Generator.
Album title: The title of the album, e.g. "Vacation 2004"; this will be the heading for the album index page. This defaults to the name of the folder in which the album is being created, but changing this entry will NOT change the name of the folder. If you wish to change the folder name, close the generator program and change the folder name as you normally would (e.g. in Windows Explorer.)
Image number: The position of the currently selected image in the list. Not editable; use Move Up/Move Down.
Image filename: The name of the file for the currently selected image. Not editable; you must change the filename manually (e.g. in Windows Explorer) and then add the image again under the new filename.
Title: The title of the selected image, which will appear below the image thumbnail on the index page and above the image in the image display and slideshow views. The default title is the image filename without the file extension (e.g. '.jpg'). Image titles within an album should be unique. This field may contain the xhtml tags for italics (<i>), bold (<b>), and emphasis (<em>).
Caption: A more detailed description of the picture which will appear below the image on the display and slideshow pages. This field may contain carriage returns as well as any of the formatting tags permitted in the Title field.
Location: The place where the photograph was taken; displayed to the bottom right of the image in the display and slideshow pages.
Photographer: The person who took the photograph; displayed to the bottom right of the image in the display and slideshow pages.
Date: If possible, the date will be read from the image file's EXIF tag, which is created by most digital cameras. Failing that, the file creation date or the file modification date will be used, whichever is earlier. The date can be changed either by highlighting and then editing the displayed components, or by choosing a date in the drop-down calendar. To manually enter an incomplete date (such as 'June 2005' or 'late 1980s'), right-click on the date-entry box and select 'manual' instead of 'standard'. Manually entered dates are in text format rather than the special 'date' format, and as such can't be sorted by date (see Selecting and Ordering Images). The date will be displayed to the bottom right of the image in the display and slideshow pages.
Associate link: This field allows you to make the image on the display page into a link. This can either be a web link or a file link relative to the album's root folder. This is especially useful for incorporating videos into an album through a thumbnail of the first frame, or a related still picture - just copy the video to, for example '[albumdir]\movies\movie.avi' and then use the Browse button to navigate to that location, or enter the path relative to the album directory manually as 'movies/movie.avi'. The path in the associate link box must use forward slashes instead of backslashes, as these links must be interpreted by a browser. Ampersands and spaces in filenames are converted into their browser-friendly forms (& and %20) for you.
All of the fields except Date and Associate link can be filled out with any text. It is not recommended to make any Title field blank, since this is how the images are labeled in both the Album Generator list and the display sidebar list. However, the Caption, Location, and Photographer fields may be left blank if so desired. The Date field may be blank if set to manual entry mode.
To apply the same entries to a group of images (for example, if they are all at the same location and/or by the same photographer), see Multiple Image Selection.
The 'album.xml' file which contains all the data from these fields is saved whenever the Save Changes button is pressed, and whenever the image selection changes. Pressing Cancel Changes undoes whatever changes have been made since the last time Save Changes was pressed or the image selection changed. Press Save and Exit when you are finished making changes. If at any time you want to cancel all of the changes made to an album since loading it into the generator, close the generator, delete 'album.xml', and rename 'album.xml.old' to 'album.xml'. Then reload the album into the generator if you want to make further changes.
Multiple Image Selection
To select multiple images, click on images in the list while holding the CTRL key (to select individuals) or SHIFT key (to select a range). The image preview pane will show thumbnails of up to 25 simultaneously selected images; if more than 25 are selected a red plus sign will appear at the bottom right of the preview pane. If more than one image is selected, the image Title box is disabled. For the other fields, if all of the selected images have the same value in that field, the text box will display the value shared by all of the entries against a green background. If the values are inconsistent, the text box will be blank against a blue background. If you change a value, the text box will turn red until the album is saved (either by changing the selecton or pressing Save Changes), at which point all selected entries will be overwritten with the new value for whichever fields have changed. The Date field cannot be blank, so if the date entries of the selected images differ, it will initially display the earliest date in the selection. However, changing to a different date will apply that date to all selected entries, similarly to the other fields. Groups of images can also be moved using the Move Up and Move Down buttons, or deleted using Remove Image.
Album Information
The Album Information panel displays the location of the album file, the number of images in the album, the range of dates of the images in the album (not including manually-entered dates, of course), and the total file size of the album. This calculated album size includes all contents of the album root directory and the images folder (if the images folder is not in the root directory). Any images which are included in the album but stored elsewhere will not be included in the album size calculation. Hidden files are also not included - to save a little space when uploading or burning to a disc, remember to delete the 'thumbs.db' files that Windows sometimes generates! Click Launch in Browser to view the album in your default browser (this may not work in Linux). This will open the first display file listed in the 'theme.info' file for the web display theme you are using ('index.xml' if you are using our default theme). Further options are available from the Advanced Album Options dialog. Click the Help button to launch the Windows help file. You can also get help for specific features of the GUI by placing the cursor in a field or highlighting a button, and then pressing F1 to go to that section of the help file.
Advanced - File Options
The Current images folder field shows the path to the folder where the images are stored, relative to the album root directory. The default folder name is 'images', within the album root directory. You may change the images folder if you wish using the Browse button, or by manually entering a path. (Note that like the Associate Link field, the path must be specified relative to the album root directory using forward slashes instead of backslashes.) This feature is useful for creating several albums from the same set of images; for example you may have a vacation album with 500 pictures, but want a smaller "best of" album with 50 pictures to show to friends with shorter attention spans, without having two copies of these images. If you change the images folder, the generator will create a new folder at the specified location if necessary, but it will not copy the images over. If you want to change the images folder for an album that already contains images, you should first copy or move the images to the new location manually or else you will get lots of error messages.
If you wish to set up an album in which the images are not all stored in a single folder, uncheck the 'Copy new images to images folder' box. From this point on, all new images which are added to the album will remain in their original locations (though thumbnails will still be created for them in the 'thumbs' directory if thumbnails are enabled). These images will be referenced via their relative path to the images folder. So if you want to move the album directory (or transfer it to a webserver), these relative paths must remain unchanged. This is simple to accomplish if the images are still stored within the album directory (for example, distributed among subfolders of the 'images' folder). Note: if there is no relative path to the image, which is the case if the image is stored on a different drive letter, the generator will give the option to copy the image to the images folder. If you later re-check the 'Copy new images to images folder' box, new images which are added to the album will be copied to the images folder, but any images previously added to the album which are in different locations will not be copied. Images which are not in the album directory and not in the images directory are never included in the calculated album size.
The Web display theme drop-down box allows you to select a set of files which determine the layout of the album when it is displayed in a web browser. All themes which are installed in the Album Generator application directory will be displayed in the drop-down list. To replace corrupted or obsolete display files with ones from the theme directory, click the Refresh Display Files button. If you load an album which uses a display theme which isn't installed in the application directory, you will not be able to update the display files unless you switch to a recognized theme.
Advanced - Image Options
If the Use Thumbnails box is checked, the generator will create smaller thumbnail images of all the images in the album and put them in a folder called 'thumbs'. The album will then reference these from the index page and the generator list, instead of rescaling the full-size images in real time. This will make the album slightly larger (about 40kb per image), but will make the index page load faster and with usually better quality. We recommend you leave this option turned on. Unchecking the box prevents the album from using the thumbs, but will not delete the generated images for you. The generator will never delete anything for you.
If the box Downsample images as they are added is checked, then when new images are added to the album they will be downsampled. This will not apply to images already in the images folder, even if those images are added to the album after the Downsample option is selected. Once the box is checked, you may adjust the maximum pixel dimensions for images. The generator will never enlarge an image, but images above the sizes specified in the Maximum image width and height fields will be shrunk to fit within the given parameters. You may also set the jpeg compression quality in the JPEG Quality field, from 1-100. Higher numbers result in higher-quality compressed images, but larger files. A setting of around 65 will usually not produce visible compression artifacts. Settings below ~55 are not recommended.
Advanced - Other Options
Checking the box labeled Record the date images are added to the album will place this information in an <addDate> field for any images subsequently added to the album. This last option has no impact on the album's display unless you modify the XSL to display these dates or use them for sorting. However, it may be useful for record-keeping. Click Clear date added information to erase these records.
The Store dates in ISO-8601 format box is checked by default. If stored in this standardized format, dates will be displayed in the browser in the specified output format (see below), or will automatically adapt to the viewing computer's date format if none is specified. If the box is unchecked, dates will be stored as they are shown in the Date field.
The Date Format field is used to specify an output format for dates (this will only apply if the dates are stored in ISO-8601 format, see above.) Use the following format specifiers to construct your desired date display format:
| Field | Full Form | Short Form |
| Year | yyyy (4 digits) | yy (2 digits), y (2 or 4 digits) |
| Month | MMM (name) | MM (2 digits), M (1 or 2 digits) |
| NNN (abbr.) | ||
| Day of Month | dd (2 digits) | d (1 or 2 digits) |
| Day of Week | EE (name) | E (abbr) |
| Hour (1-12) | hh (2 digits) | h (1 or 2 digits) |
| Hour (0-23) | HH (2 digits) | H (1 or 2 digits) |
| Hour (0-11) | KK (2 digits) | K (1 or 2 digits) |
| Hour (1-24) | kk (2 digits) | k (1 or 2 digits) |
| Minute | mm (2 digits) | m (1 or 2 digits) |
| Second | ss (2 digits) | s (1 or 2 digits) |
| AM/PM | a |
NOTE THE DIFFERENCE BETWEEN MM and mm! Month=MM, not mm!
Examples:
| "NNN d, y" matches: | Jan 01, 2000 |
| Dec 1, 1900 | |
| Nov 20, 00 | |
| "M/d/yy" matches: | 01/20/00 |
| 9/2/00 |
"MMM dd, yyyy hh:mm:ssa" matches: "January 01, 2000 12:30:45AM"
You may change the character set for 'album.xml' in the Character Encoding field. By default this is set to UTF-8, and any special characters that you input in any of the text fields in the album generator should be automatically converted to this encoding. If for some reason this is not working, or you want to use characters not included in UTF-8, you will need to use an encoding which includes those characters. Don't modify this unless you know what you're doing.
To apply the current album's settings (everything in the Advanced Album Options window) as the default for future new albums, click the Set as default button. To apply your default settings to the current album, click the Reset to defaults button.
Viewing Albums
Click Launch in browser to view the album in your default web browser (this may not work in Linux). This will open the first display file listed in the 'theme.info' file for the web display theme you are using ('index.xml' if you are using our default theme). To view the album manually in Windows, if a web browser is your default program for opening XML files you can simply double-click the 'index.xml' file (NOT the 'album.xml' file!) to open it. If double-clicking brings up a different program than the browser you want, in Windows Explorer (WinXP and later only) you can right-click the 'index.xml' file and choose Open With->[your choice of browser]. You can also drag the 'index.xml' file into a browser window. This will load the album index page showing thumbnails and titles for each of the images. Click on a thumbnail to view the display page for that image. (If you are using a web display theme which does not use 'index.xml', substitute the appropriate display file in the above instructions.)
If you are using the default theme, from the display page you can navigate between images using the Previous and Next buttons as well as using the navigation pane on the left which lists all the titles. Full-Size Image will show the image at its full resolution and Printable View will show the image with its additional data in a printable size and color scheme. From the index page or from a display page you can click Launch Slideshow to view a full-screen version of the album without the navigation bar and other links (especially good if you are using a projector). You may need to press the F11 key to trigger a completely full-screen browser.
If you are using Internet Explorer the Information Bar may pop up asking that you confirm that you want to display active content from your hard drive. If you want to permanently eliminate this warning, go to Tools->Internet Options, choose the Advanced tab, scroll to the Security section, and check the box labeled Allow active content to run in files on my computer. NOTE THAT ENABLING THIS BOX MAY CONSTITUTE A SECURITY RISK. You will have to restart the browser for this setting to take effect.
Putting Albums Online
Once you have created an album, it is already formatted to display online just as it displays from the local file. To put an album online, upload the entire album folder, including the subfolders. If you have set the images folder to be outside the album directory, you will need to upload that other folder as well. If you're using our default display theme, to send a link to the album, use the path to the 'index.xml' file:
http://[webserver]/[album folder]/index.xml
To link to the display of a particular image, it is easiest to navigate to the image in a browser after the album is uploaded and copy the URL, which will be something like:
http://[webserver]/[album folder]/files/nav_display.html?25#15
Similarly, if you want to put the album on a CD or other storage device, if the images folder has been changed from the default 'images', you should copy the images folder as well as the entire album folder onto the storage medium. Remember that paths are specified relative to the album folder, so that relative path must remain the same when you copy the album elsewhere.
Web Display Themes
|
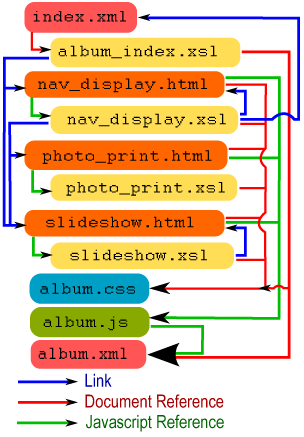
Our web-browser-based display system uses a mixture of HTML, XML, XSLT, CSS, and Javascript. The photo metadata is contained in a single XML document, 'album.xml', which can be written by hand or generated by the Album Generator. Any user can create an alternate web display theme by altering our display files or writing new ones. To install a theme that the Album Generator will recognize, create a folder in the 'themes' directory and place the display files inside, as well as a 'theme.info' file which specifies how the files will be copied into the album directory. The 'theme.info' file should begin with a line specifying the version number, followed by a list of files to be copied into the album root directory. To copy files into a subfolder of the album directory, the subfolder name in square brackets should precede the list. The first file listed in the 'theme.info' file will be invoked by the Launch in browser button in the Album Generator. See the default theme.info file as an example. For the default theme, the album root directory should contain 'album.xml', the album index page ('index.xml'), and the 'files' folder which contains the rest of the display files. For those wishing to modify the default theme, the file architecture is shown to the right. Much of the display format (colors, text sizes, etc.) can be easily changed by modifying the CSS file. The XSL files reference it, as do the HTML files. The rest of the display format may be modified within the XSL files, though this requires a little more expertise. Notably, the number of columns on the index page may be modified in the 'album_index.xsl' document by changing the 'numColumns' variable. The size at which the images are displayed is decided within the XSL, and should scale appropriately to the size of the browser window. The scaling occurs in discrete steps which are factors of common image dimensions, to avoid aliasing. The HTML files themselves do not contain any display formatting; they contain only the page initialization and calls to the Javascript necessary to tell the XSL which image to display out of the XML list. Modifying the HTML files or the Javascript file is not advisable. |
 |